How to Make an android app without coding | app development software for beginners

How Create Free Mobile App For Android in English Hindi Urdu

Create Free Mobile App For Android


How to Make free Mobile App? Is Article mein aj hum apko bate ge how to create an android app without coding for free ap kaise without coding free mein mobile app banna sakte hain Agr apka bi koi blog hai ya ap apni khud ki app banna chahte hain apny blog ka liye ya kisi bi tarha ki app ap bana sakte hai wo bi kuch minutes mein agr ap apni app bana chahte hai tu is article ko complete read karna ho ga. is Article mein hum apko English mein Aur Hindi Urdu mein bi bate gye agr apko english mein parhna hai tu upr english mein nechy Hindi urdu mein apko complete method batya  gaa hain with screen shots free app bane ka.android app maker software free download.


How to create a Free App In Hindi Urdu?

how to create an app for free and make money Friend agr ap apni kisi bi Trha ki app bana chahte hai tu  ap is website se kuch minutes mein bana sakte hai  bhot simple aur easy setups hai. create android app online without coding


create free android app online without coding

  • subse phyle apko is mobile app builder AppCreator24.com site par jana ho ga aur apna account create karan hona ga
  • is ka bad apne apna account bana hai apko sign up karna hai 
  • apna name,conutry,email aur password dena hai. 
  • jub ap ye sub de gye tu apki email par verification code aye ga
  • apne apni email ko verify karna hai.
  • jasy ap email ko verify kare gye apne 
  • ab sign in karne lena hai 
  • apka samne kuch asa page open ho ga.apne create app par click karna hai.

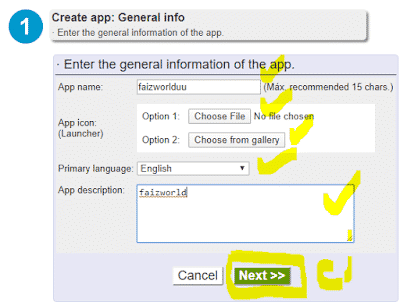
  • is bad apka smne asa page aye ga apne idr apni app ka name 
  • aur App description: Aur language select kare leni hai aur app ka icon bi upload karna hai
  • Ab next par click karna hai.
  • Ab ek new page open ho ga
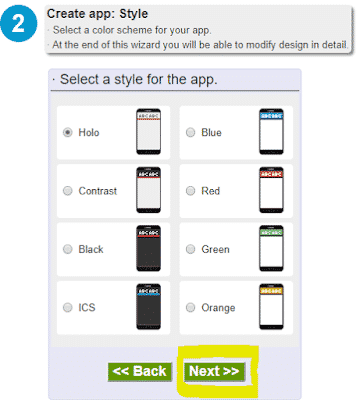
  • Ab apne apni app ka Design color select karna hai 
  • Aur Design select karne ka bad next par click karna hai.


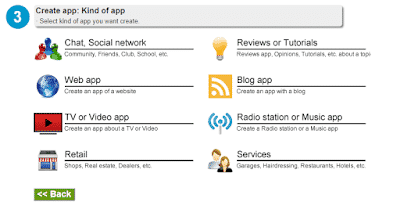
Ab apne apni app ki category ko select karna hai


  • main is mein apko blog ki app bana kare dekha rha ho agr  ap kisi aur traha ki bana chahte hai tu ap us category ko select kare.
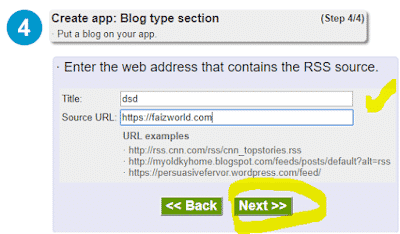
  • Apne blog ka titleaur url dey aur next par click kare de


  • Ap ki App ready ho gi apki app ban gi hai
  • ap ka pass asa page open ho apn go to app manger par click karan hai


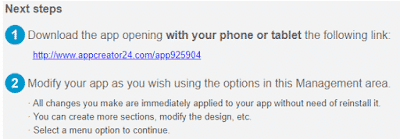
  • jase he ap go to manger par click kare ge apka samne apki app ki url link ay jye gi
  • ap app ko download kare ka check kare  sakte hai 
  • aur is app ko playstore par  publish ni karwa sakte hai.
  • is link ko share kare ka apni app par bina playstore par publish keye ap admob ki ads bi lga sakte hai.

  • Friends Ap is app mein changes bi kare sakte hai sub kuch change ho sakta hai
  • agr app is mein changes karna chahte hai tu 
  • apko side bar mein kuch options milte hai
  • jin mein General info Sections Offices Products Send notifications Conversations Ads Statistics hai
  • Ap gerneral info mein jya kare app ki information ko change kare sakte hai
  • is ka alwa design wagar sections bana sakte hai.

How to Make an Android App for Free in english?


how to create an app for free and make money? In the previous topic we have seen that one of the most available ways to make money online is by creating an application for mobiles (app) and gain many users that use it. In this topic we will see how to create this app.

 best free app builder AppCreator24.com allows to create many different types of apps but we need to create an app that is interesting to the greatest number of people possible and, at the same time, these users visit the app frequently. (So ads shown in the app will be seen more times and therefore you will make more money).

We recommend you to create an app where users can communicate with other users. This offers itself a dynamic content (which changes frequently) and causes users to access very often to see updates and actions of other users. The goal is to create a community of users (social network).


Create an app of this kind with AppCreator24.com is very fast, but before we begin, we have to know which will be the theme of our app.

There are infinite themes. We put here merely as examples some themes that we believe would be interesting to create a successful app:

  • App about mountain bikes with some chats to discuss about routes, mechanical issues and challenges. Users could put pictures of their bikes in his profile. They could also see how far other users are to meet someone.
  • App about cinema where users could talk to other users about their favorite movies. There could be for example, a chat about film premieres, another about a particular movie, etc.
  • App on a specific town where residents and visitors could talk to each other. There could be a section of interesting places, other about parties, etc.
  • App about a famous game, about a TV show, etc.

Once we have decided the theme we must decide a name for the app. It must be a short name, about 15 or 20 characters, because it’s the one that will be displayed next to the icon of the app once the app is installed on the phone (or tablet).


Just the other very important element to decide is the icon of the app. If you don’t have any knowledge about design software it’s more practical to find an image that is already created and that identifies our app. For example we can use iconfinder.com or iconarchive.com to find icons.


Once we know the theme, name and icon of our app we can proceed to create it. To make this you must first create an AppCreator24.com account. This can be done easily from the “Sign up” button which is on AppCreator24.com home.
Once the account is created we can access to our control panel and, from there, the first time you will access directly to the wizard to create an app. All choices we make at the time of creating the app can be modified later from the control panel, so you shouldn’t worry too much if you don’t have clear some choices.
On the first page we will be asked for the app name and icon. On the following page we will select a color scheme. We can change it later in detail. On the next page we must select the type of app you want to create. As we have said we want to create an app like “Chat, Social Network”, so select this type.

In the following pages we are asked about which elements we want to include in the app. First we are asked if we want to include contact information. If you don’t want to show any contact info leave “No” selected and press “Next”.

Then we are asked if we want to put a link to any web. We can set it or not.
Then we are asked if we want to put a chat. Is important to answer Yes because a chat in the app will give to it a lot of activity and will allow users to talk to each other. Selecting “Yes”, two selection boxes appear. Mark the first only if you want to include a global chat finder, that is, if we mark this option we allow our users to search and participate in chats created in other apps. Mark the second box only if you want that our chat appear in the global chat finder, therefore, we would allow to users of other apps to participate in our chat. You have to mark or not these options depending of the privacy that you want to give to your chat.


On the next page we are asked if we want to include a Users finder in the app. Please select “Yes”. This will include a section in the app where users can see all other user profiles of the app with photos, comments, likes, etc. On choose “Yes” a select box appears, if you mark it, in this section will appear users profiles of other apps that also have this option selected. Therefore, if this option is selected, the profiles of your app users also will appear in other apps. Again, depends of the privacy you want to give to your app if select or not this option.

Finally, on the last page, we are asked if we want to create a section in the app with our text and images. If we want to create it select “Yes” and enter the information you want.


In this page, on press Next button, the app will be created and we will access to the apps management page. In the next topic we will see how we can complete our app.

 how we can complete our app

In the previous topic we have seen how to create our app. Now that that we have created it, we have to complete it defining the design and may adding some sections.
First thing we recommend after create the app is download it to your mobile device, this way we can see how the app is running. You only need to download it once and then all the changes we make from our control panel will be reflected in the app (just closing and reopening it).

We can download the app from the image below left menu (“Download app“). When we download and install the app on our device it’s normal that a security warning message is displayed. This message is given by most mobile devices when you try to install an app that isn’t yet published in Google Play. We must accept this message to install the app. Later we will see how to publish the app in Google Play.
About design there are several aspects that we can decide. All design options are under “General info” > “Design“:
  • Colors: We can establish a general color scheme. We recommend to set one of four styles labeled “Material” as these are more modern combinations, however it depends of the style that we want to give to our app.
  • Menu types: You can choose from 3 menu types: Top menu, Sliding menu, and Table type menu. We recommend to test the three menu types to check which is best to our app.
  • Main icon: This icon is very important because it’s always displayed in the app at the top left. From this option we can change it.
  • Loading image: The image displayed while loading the app. We can put an image different that the main icon. We also can hide it and not show any image.
Another important feature that we can use is to display a welcome message to the app. In this message we can put, for example, who we are, app policies, privacy policies, an explanation of the app, etc. The option to display this message is in “General info” > “Launch message”.


In addition to design, the most important is probably the app sections. At the time of create the app some sections has been created depending of the choices you have made in the wizard. Sections can be managed from the “Sections” section.
From “Sections” you can add new sections, modify and delete existing sections. Another feature that can be done is to change the sections order. To do it you only have to drag sections up or down and, after, press “Save sort order” button.
If at the time of creating the app we have followed the recommendations in this guide, you have created at least one Chat type section and a Users finder type section. If not, now we can create them.

Number of sections and their type depends exclusively of the type of app that you wish to create. There is no specific requirement to create a section or other but, as we mentioned at the beginning of the guide, if we want to create an app with many users, it’s highly recommended to have at least a Chat section and a Users finder section.
Once we’ve configured the design and sections of the app, we’ve already configured the most important. From here you can go making adjustments and trying different options of your control panel to refine your app.
Hope Aj ka Article apk liye helpful ho ga kindly is article ko share zaror kre please.


error: Content is protected !!